Christine shows the Christmas themed keys of CTMH's Artbooking Cricut Cartridge which are on pages 74 and 75 of the handbook. I love the photo mats that are included on these keys, which, as she points out in the video, also make wonderful journalling spots for your pages!

Tuesday, November 26, 2013
Saturday, November 23, 2013
Making a Splash at the Water Park
This layout uses very little CTMH products...but I do love how it turned out. The base pattern paper is from a cardstock stack called Over the Rainbow, by We R Memory Keepers - which has been in my stash for a number of years now. It is a simple graph paper design, but I was quite fond of it and was waiting for the right place to use it.
The title and the two embellishments are from a Cricut Cartridge called Life's a Beach and the ribbon is Offray Ribbon that I picked up a Wal-Mart - probably a few years ago.
I cut the circles (page 21 in the handbook) and the journalling tag (page 70 in the handbook) using the CTMH Art Philosophy Cricut Cartridge and some cardstock from my stash. I still need to journal for this layout, but for all practical purposes, it is complete. I don't often use circles on my layouts, but when I do, I am usually very pleased with the results - and this layout is no exception.

Friday, November 15, 2013
Artbooking Made Easy: Cross-Cartridge Collaboration (S01E11)
Click HERE to join Carlie as she shows how the three CTMH Cricut Cartridges can work together to create even more variety in your crafting projects. I love all three of these cartridges and they are by far my go to cartridges when I am scrapbooking or making cards. I own a good number of other Cricut cartridges (every single one purchased before I ever even knew that CTMH made Cricut cartridges.) However, since I have added the 3 CTMH cartridges to my collection, I rarely use any of my other cartridges. They contain such a variety of cuts that I can almost always find the perfect cut for my project on one of the three!
Wednesday, November 13, 2013
Artbooking Made Easy: Freedom Layouts (S01E10)
Click HERE to view this video from CTMH. You will see the Freedom key in action as Carlie shows it used on a traditional patriotic themed layout and then shows cuts from this same Key used on layouts that are not patriotic in nature This is the true genius of the CTMH Cricut Artbooking cartridge - layouts can be as simple as picking a theme and making the coordinated cuts. Using this method - all of the work has been done for you. Just make the cuts. However, you are able to use most of the cuts from each key on other projects and the creative opportunities are fun to explore. I enjoy flipping through the handbook and sometimes a particular cut will just jump out as exactly what I needed to add that final finishing touch to my layout. I hope you enjoy today's installment in the Artbooking Video series.
Tuesday, November 12, 2013
Artbooking Made Easy: Festive Mini Albums (S01E09)
In this video, Jill gives us a peak inside two festive mini albums that were created using the CTMH Artbooking Cricut Cartridge. The albums are packed with wonderful pages and embellishments there were created using Artbooking. I love getting to see inside to see all the great design ideas. These albums are amazing. Hope you enjoy the video :-)
Saturday, November 9, 2013
November SOTM
This month's SOTM is called Illuminate. It contains multiple images that reflect the theme of light, but the corresponding sentiments include words of encouragement and statements of faith. It can be yours for only $5, with any $50 purchase during the month of November.
 |
| Illuminate, November SOTM |
 |
| Artwork that can be made using Illuminate |
Saturday, November 2, 2013
Clearly the Best: Preserve with Pizazz (S02E02)
In this video Monica and Christine give a peek inside the pocket album and demonstrate how Christine customized the cover. The technique is simple and the possibilities are limited only by your imagination and supplies...
Wednesday, October 30, 2013
Artbooking Made Easy (S01E06): Designed Décor Flip Stand Album
This video shows how pairing the Designed Decor Flip Stand with the CTMH Cricut Artbooking Cricut Cartridge results in a wonderful, and easily personalized, home decor item what will display your photos for everyone to enjoy. You could even create pages with seasonal themes and pictures and change the display throughout the year in order to keep it fresh and timely Imagine beach photos displayed during the summer, Thanksgiving pictures from previous years on display during the month of November and Christmas pictures from previous years on display during the month of December...each year just add a page that features memories from the previous year and your family is sure to enjoy reminiscing about the great times spent together. The Flip Stand is a simple and fun way to bring a few pictures out of your scrapbook albums and right into the center of the fun.
Tuesday, October 29, 2013
Project Inspirations: Background Stamps
Lisa explores some "out of the box" uses for background stamps. I am always looking for ways to expand the creative functionality of my supplies and this video provided a couple of fun ideas.
Monday, October 28, 2013
Artbooking Made Easy: Everyday Layouts (S01E08)
The CTMH Artbooking Cricut Cartridge is a dream cartridge for this scrapbooker. It has so many amazing cuts that can be used to embellish any type of layout. Of course, the professionally designed layouts that are are already planned and contained on each of the scrapbooking themed keys are wonderful in and of themselves, but they are only a drop in the creative bucket. In this video, Monica demonstrates the versatility of cuts from several of the themed layouts, showing how beautifully many of these cuts can be used in everyday layouts. My only complaint about this cartridge (or the other two CTMH cricut cartridges) is that I don't ever have enough time to scrapbook! But when I do, I almost always pull creative elements from one of my three wonderful CTMH cricut cartridges to add creativity and variety to my layouts. With 700 images/cuts on each cartridge - I will never run out of options :-)
Sunday, October 27, 2013
Pictures, Pictures, Pictures!
I believe that it is very important to include all aspects of a scrapbook page in each layout...design (over all layout, composition, pattern paper and embellishments), pictures and journalling. But, for me, the pictures are the most important part and often dictate all other aspects of my design. In other words, when planning a layout, I always select my pictures first. Based on the number of pictures I want to include in a layout, I then proceed to pick a layout that will accommodate this number of pictures. I almost always have a lot of pictures on each layout and often this means there is little room left over for embellishment :-(
Today's layout is no exception - it includes 12 pictures! After getting all of my pictures on the layout, there was very limited room for embellishments. This is one reason that I like to treat the journalling area like an embellishment. Today's layout uses two journalling boxes that were cut using the CTMH Artbooking Cricut Cartridge and then stamped using Ruby Exclusive Ink and the coordinating stamp from D1571, Sweet and Love, which is one of the three stamp sets that come bundled with the Artbooking cartridge. I love how the journalling blocks on this layout do double duty - telling the story and embellishing a picture-heavy layout.
The trio of heart's were cut using the heart on page 71 of the CTMH Artise Cricut Cartridge handbook. I welded 3 hearts together for for the base of my embellishment using my Gypsy - but the weld can also be accomplished using the Cricut Craftroom. I then stamped the heart from D1571, Sweet and Lovely, using Ruby ink on a scrap piece of cardstock and then trimmed it out using my micro-tipped scissors. I layered it over the center heart of the trio of hearts using 3-D Foam Tape.
Finally, the title was cut (page 69 of the handbook) using the CTMH Artiste Cricut Cartridge. The pattern paper that served as the base of this layout was from a glitter stack called Laundry Line, by My Mind's Eye.

Thursday, October 24, 2013
Artbooking Made Easy: Fall into Artbooking (S01E07)
Watch the video and see the Autumn/Harvest themed keys in action. Jill will show you what beautiful cuts are included on pages 72 and 73 of the CTMH Artbooking Cricut Cartridge. I love how the photo mats, when cut as a part of the layout, are already sized for my photos, but when I use real-dial size to modify their size, they suddenly become an accent element for my page. In this video, Jill used 3 different sizes and different colored cardstock and the result was the photo mat cut also became the base for two accent clusters and a title. The resulting design continuity was subtle, but effective, because the shape repeated throughout the layout, but the variety of sizes and cardstock colors gave enough diversity to keep the layout interesting, but cohesive.
Saturday, October 19, 2013
Mother's Day Scrapbook Page
Today's layout is from Mother's Day a couple of years ago. I used
contraband cardstock from my stash. The lighter colored textured
cardstock is from Bazzill Basics line called Two Scoops, Irish Mint. and
I have no idea what company the darker cardstock is from. This layout
is a slightly modified layout from CTMH Reflections Scrapbook Program,
page 124, Sampler - Pieced, 10d.
I also stamped using Washi Wonder (an exclusive Hostess Rewards stamp set, D1558) and Olive Exclusive Ink on a scrap piece of Colonial White Cardstock. I then used my micro-tipped scissors to trim the pieces out and then attached them to my layout The Washi Wonder stamps set combined with scraps of cardstock and ink of your choice is like having an endless supply of washi tape to match almost any layout/color/card - so much fun!
My title was cut from CTMH Artiste Cricut Cartridge, page 74 of the handbook. However, I used my micro-tipped scissors to carefully cut away the word "Happy" because I didn't want that in my title.
I also cut the lace medallion using the CTMH Art Philosophy Cricut Cartridge, page 66 in the handbook. I added some bling from my stash (Gemstones from the Paper Studio) to finish off this layout.

Tuesday, October 15, 2013
Project Inspirations: Mixed Papers
I really enjoyed learning a bit about how the CTMH paper packs are designed - with hero papers and what I'd call the side-kick papers (those who play a supporting role in the layouts and let the hero papers take the center stage.) In this video, you will see how easy it is to combine these side-kick papers from various paper packs to get many new design options. Watch and learn....
Sunday, October 13, 2013
Hexagon Card
 |
| Sweet As Honey Card |
My challenge was to use My Acrylix Stamp Set Honeycomb, C1537, Hexagon Irresistibles, Z1858 and the amazing CTMH Artbooking Cricut Cartridge, Z1906.
I cut the border on page 66 of the Artbooking Handbook. Using the Gypsy, is the equivalent of cutting without the real dial size on, so the height of my image ended being a staggering 22 inches...but do not fear, the resulting cut was no where near 22 inches, although it did extend past the 12 x 12 inch Cricut mat. I cut this border using Pear cardstock.
I trimmed off the hexagon that would have been where my sentiment is and then placed the border over my card base (5.5 inches by 4.25 inches) so that the left upper corner of the hexagon at the top of the border aligned with the upper left corner of my card. I glued the border down and then trimmed off any part that extended past my card base.
I then stamped my sentiment using Pear Exclusive Ink (Z2197) Stamp Pad. I used the linen looking hexagon stamp and stamped inside all of my hexagons using the Pear Exclusive Ink.
I used Lagoon Exclusive Ink (Z2195) Stamp Pad, first generation stamping, and the remaining patterned hexagon stamps to stamp in seven of the hexagons, which left two hexagon spots what contained only the pear linen stampings.
I also used the bee and the dashed flight pattern to stamp using Pear Ink. I was able to bend the dashed flight pattern into a curve to get a better fit for the area that I had to work with on my card.
I used Pear Ink and a sponge dauber to color one of the Hexagon Irresistibles and Lagoon Ink and a sponge dauber to the other Hexagon Irresistibles. I then secured them both in the remaining hexagon spots on the card using Glue Dots.
I stamped my sentiment which used two stamp sets... Honeycomb and Card Word Puzzle, C1494.
I hope you enjoy!
Sunday, October 6, 2013
Artbooking Made Easy (S01E05): Halloween Mini Albums
This video sheds some light on the two Halloween Mini Album keys that are on the Close To My Heart Artbooking Cricut Cartridge. These keys are found on pages 54 and 55 of the handbook (keys U and I.) I love how the measurements are already done for us - which certainly cuts done on the prep time needed to complete a mini album. It was also helpful to see the two finished projects and the different looks that can be achieved with cuts from these two keys. Hope you enjoy this video.
Saturday, October 5, 2013
October SOTM
Are you already preparing for Christmas...at my house if the Christmas tree is not up before Thanksgiving- I feel as though I will start the Christmas season behind. My reasoning is that I want to enjoy every single minute of the Christmas season, and if my home is already decorated, then as soon as Thanksgiving is over, we will transition seamlessly into Christmas and all will be well :-) It is also my way of maximizing the days in which I get to enjoy the sights and sounds of the season...
Anyway, early October is a bit early for even me to begin thinking about Christmas, but the amazing staff at CTMH knows that in order to allow time to create our Christmas projects, we should start planning things in October. So my hat goes off to them for reminding me that it is not too early to start thinking about Christmas and making plans for the projects that I want to complete this year.
October's SOTM is just amazing! It contains 5 images, 6 sentiments, and a border stamp. I just love it. And to make it even better, 4 of the images have corresponding cuts on the CTMH Art Philosophy Cricut Cartridge! This will truly be a fun SOTM, and it can be yours for just $5, with any $50 purchase during the month of October.
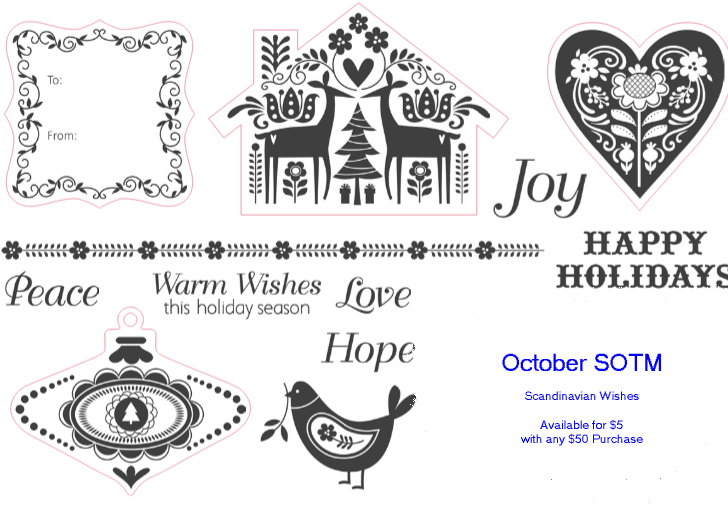 |
| Images that are included in Scandinavian Wishes |
 |
| Samples of Artwork using Scandinavian Wishes |
Wednesday, October 2, 2013
Loving 4x8 Cards
I have quite a few envelopes leftover from the 4x8 photo Christmas Photo Cards that I am fond of sending. Over the years, I have saved the extras, so I have quite a collection. I recently needed to make a couple of cards and decided this would be a fun size to make. Here are the directions for each card:
I started by cutting an 8x8 inch square from White Daisy cardstock for each card. I then folded each square in half to get my 4x8 inch card bases.
I then cut two 4x8 rectangles from For Always B&T pattern paper.
I cut two 10 inch lengths from the Tulle Ribbon, which is a retired product, I regret to say. But I do love it and will be quite sad when I use up my roll.
For each of my two cards, I then cut the Tag at 2 inches from page 41 of the Art Philosophy Cricut Cartridge using the For Always B&T pattern paper and two additional cuts from the scrap of my White Daisy cardstock. I glued this three layers together to get result in a chipboard like piece. I also cut three circles at 1.25 inches from page 48 of the Artiste Cricut Cartridge from the White Daisy cardstock scraps and glued them together to get a chipboard like piece.
I stamped different sentiments on the circles... I stamped the sentiment frame from the Perfect Fit Thanksgiving My Acrilix Stamp Set, B1427, using Black Exclusive Ink. I then stamped the Thank You sentiment from the same stamp set on on and the words, "Thinking of You" from Card Word Puzzle, C1494, on the other. I then adhered the circles onto my tags, centering.
Next, I threaded the tulle segments through the openings on my tags and the centered them on my 4x8 rectangle of the For Always B&T pattern paper. I used tape to secure the tulle to the back of the B&T paper. I then adhered this to me card base. The last step was to attached a 3/8 inch by 8 inch strip of For Always B&T pattern paper. I will eventually stamp a sentiment on the inside of the cards, but I'll save that step until I actually use the cards and that way I can tailor the sentiment to the recipient.
I also wanted to make the envelopes coordinate with the cards so I attached a 6x2.5 inch scrap of to the inside of my envelopes. This segment of coordinating B&T paper covered a section of gold foil that lined some of my envelopes, which was a vast improvement because there was no gold anywhere on either of these two cards! Here are pictures of my cards and the coordinating envelope:
 |
| Thinking of You Card |
 |
| Thank You Card |
 |
| The inside of the two cards |
 |
| The Inside of the Coordinating Envelope |
Thursday, September 26, 2013
Artbooking Made Easy (S01E04): Spooky Halloween Layouts
The newest Artbooking video and it features Halloween layouts - so fun!
Tuesday, September 24, 2013
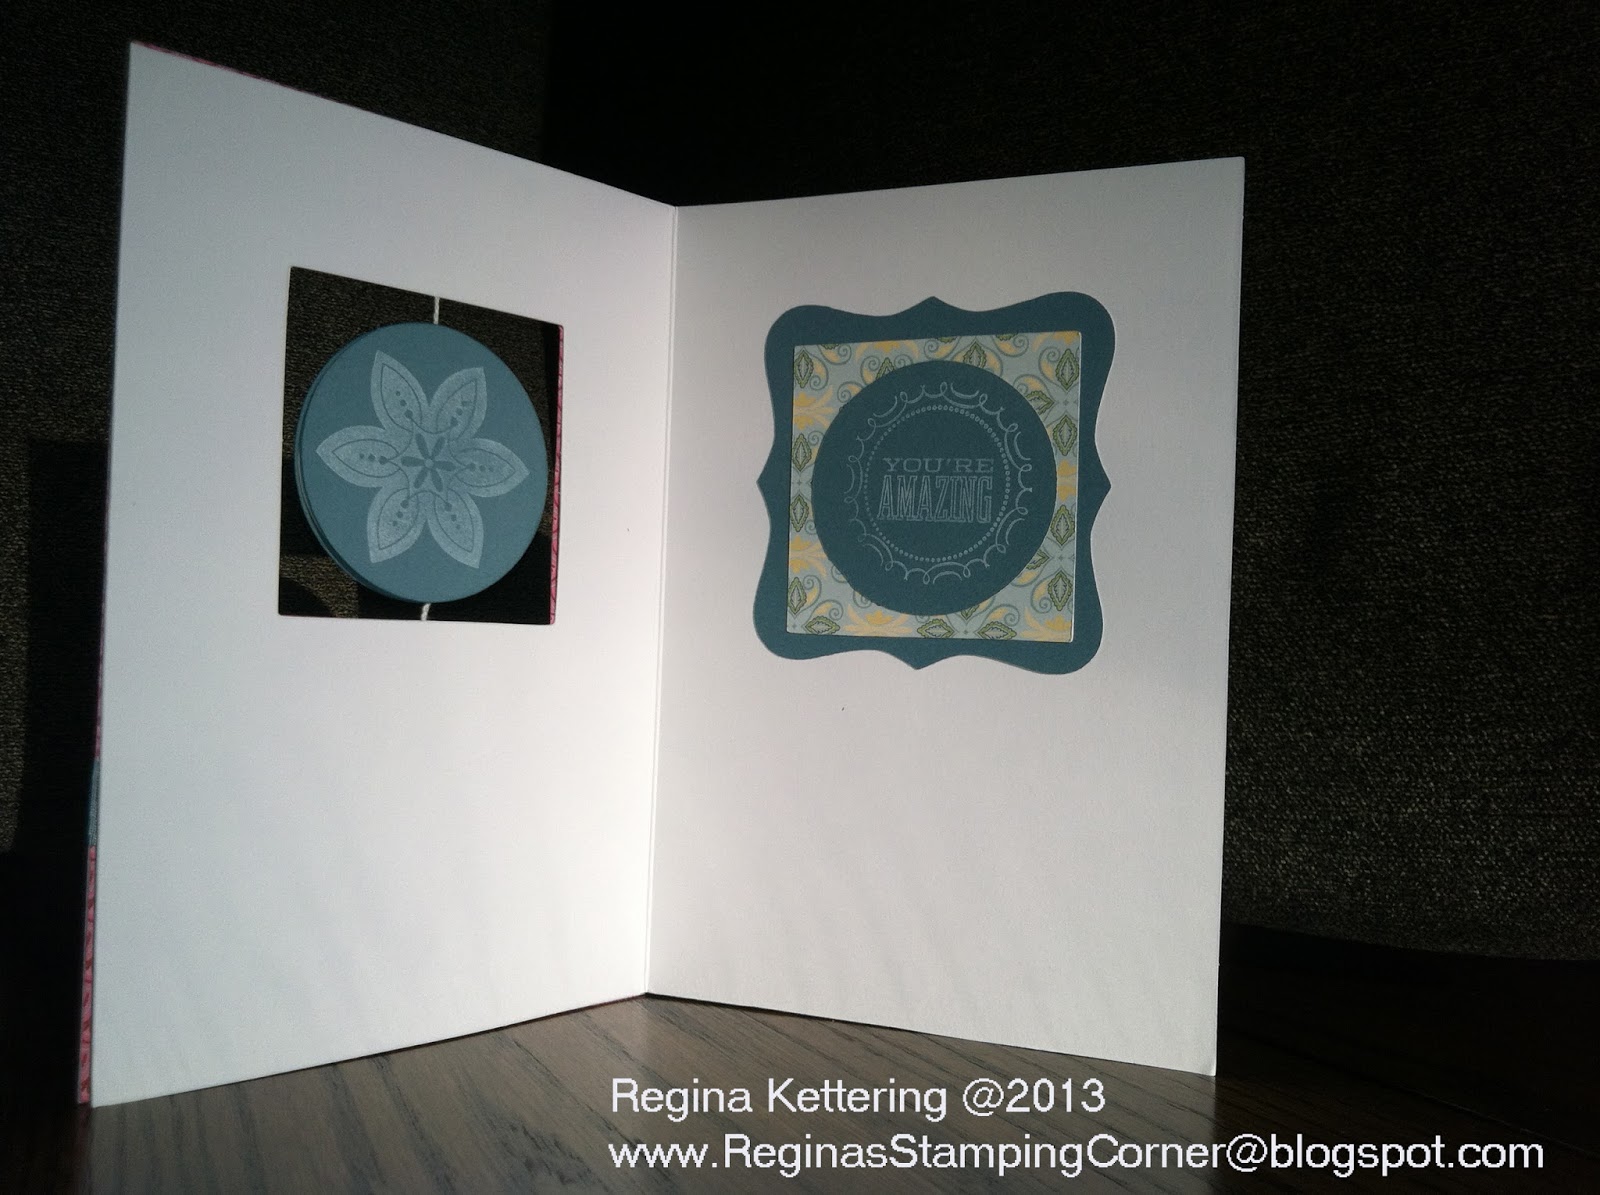
Spin Cards - My Take
The new CTMH Spin Cards are a lot of fun to make and they offer the crafter a fresh, new, fun pallet upon which to be creative. I recently hosted a card workshop and these are the cards that I came up with for my ladies to make...
To make this set of cards, I used the Chantilly paper pack because it still remains one of my absolute favorite paper packs! After making a set of 10 cards, there was still plenty of paper left over to use for other projects, so I'm sure you will see Chantilly used in future posts!
I used the following supplies:
White Daisy Spin Cards and Envelopes, z1866
Chantilly Paper Pack, x7162b
CTMH Art Philosophy Cricut Cartridge, x1686
Color Ready Seam Binding, z1732
Sparkles Clear Assortment, z1752,
Cotton Candy Re-Inker, z2293
Buttercup Re-Inker, z2210
Twilight Re-Inker, z2260
The solid color card stock pieces were all cut from cardstock included in this paper pack: Cotton Candy (Card 1), Buttercup (Card 2), and Twilight (Card 3). For each card I cut:
Card 1 was stamped using Cotton Candy Exclusive Ink and
I also dyed a 10 inch segment of Color Ready Seam Binding, z1732, for each card using the corresponding color of Re-Inker. I also used three 4 mm Clear Sparkles on each car. At this point in the process it is only a matter of assembling each card.
Just one more tip: you could also choose to just save the circles and stamp them with whatever theme you may need for a card in the future! This is a great way to maintain maximum versatility - the card can become whatever theme you need it to become - birthday, thank you, get well, etc.
 |
| Front of Card 1 |
 |
| Inside of Card 1 |
 |
| Inside of Card 2 |
 |
| Front of Card 2 |
 |
| Front of Card 3 |
 |
| Inside of Card 3 |
To make this set of cards, I used the Chantilly paper pack because it still remains one of my absolute favorite paper packs! After making a set of 10 cards, there was still plenty of paper left over to use for other projects, so I'm sure you will see Chantilly used in future posts!
I used the following supplies:
White Daisy Spin Cards and Envelopes, z1866
Chantilly Paper Pack, x7162b
CTMH Art Philosophy Cricut Cartridge, x1686
Color Ready Seam Binding, z1732
Sparkles Clear Assortment, z1752,
Cotton Candy Re-Inker, z2293
Buttercup Re-Inker, z2210
Twilight Re-Inker, z2260
The solid color card stock pieces were all cut from cardstock included in this paper pack: Cotton Candy (Card 1), Buttercup (Card 2), and Twilight (Card 3). For each card I cut:
- three circles (pg 21 of the Art Philosophy handbook)
- one shaped base (page 53 of the Art Philosophy handbook) (used on the inside of the card)
- one 5x2 inch rectangle.
Card 1 was stamped using Cotton Candy Exclusive Ink and
- Heartfelt Birthday Wish, M1033
- You Only Live Once, B1434 (Only available as a Hostess Reward)
- Hooray Bouquet, D1491
- Baby Carriage, M1027
- Babycakes WOTG Stamp Set, D1569
- A Garden, A1119
- A True Thank You, M1029
- You Only Live Once, B1434 (Only available as a Hostess Reward)
- Love/Joy/Hope/Fun, D1498 (One of 2 Stamp Sets bundled with Art Philosophy)
I also dyed a 10 inch segment of Color Ready Seam Binding, z1732, for each card using the corresponding color of Re-Inker. I also used three 4 mm Clear Sparkles on each car. At this point in the process it is only a matter of assembling each card.
Just one more tip: you could also choose to just save the circles and stamp them with whatever theme you may need for a card in the future! This is a great way to maintain maximum versatility - the card can become whatever theme you need it to become - birthday, thank you, get well, etc.
Sunday, September 22, 2013
Artbooking Made Easy (S01E03): Summer Mini-Albums
The newest installment in the Artbooking Made Easy Video Series:
Wednesday, September 18, 2013
Artboooking Made Easy (S01E02): A+ School Layouts
As promised, here is the next video in the Artbooking Made Easy video series. Spend a few minutes to watch it and see the wonderful school themed layouts you can make by using cuts from just a couple of keys. But many of the cuts on these keys are versatile enough to be used on any layout theme, especially the overlays! The ability to mix and match cuts found on various keys makes the creative options almost limitless!
Friday, September 13, 2013
Hostess Rewards: Better than Ever!
CTMH has made the Hostess Rewards program even better! Now when you host a gathering and earn Hostess Rewards, you will be able to apply those rewards to exclusive Hostess Only stamp sets - and they was so adorable! And to make the deal even better, these stamp sets are offered to Hostesses at discount prices. For example, Washi Wonder, a D-size stamp set, would retail for $17.95. However, you would only need $10 of your Hostess Rewards to purchase this versatile stamp set. Watch the following CMTH corporate video to learn more about this enhancement to the Hostess Rewards program and to see Kristine use Washi Wonder on a couple of projects.
Monday, September 9, 2013
Artbooking Made Easy (S01E01): Getting Started with Cricut Artbooking
The newest CTMH Cricut Cartridge, Artbooking Z1906, is just amazing. I have played with it just a bit, but have yet to make a project - there are just not enough hours in a day! However, I know that once I have time, I will have so much fun creating with this amazing cartridge.
CTMH has announced a new series called Artbooking Made Easy. Over the next 8 months, September 2013 through April 2014, artwork from Artbooking will be featured on Jeanette Lynton's blog, the CTMH YouTube Channel and the CTMH Facebook page. I will post the videos here on my blog so that you will be sure and not miss any of them. While this cartridge has a lot of the work already done for you in terms of planning mini albums and scrapbook pages, it is packed with wonderful cuts that are versatile and, therefore, can be used in a variety of settings. Let's start learning...
Saturday, September 7, 2013
Decision Made :-)
I have loved the art of scrapbooking for over 15 years now and, as most of you can probably relate too, I have collected a lot of supplies! I only discovered Close to My Heart a little over a year ago and I am certainly a great fan of the amazing products that this company carries - so much so that I decided to become an Independent Consultant and start a blog! However, I have struggled with whether or not to include projects on my blog that use papers, embellishment, etc, from companies other than CTMH. While the primary goal of this blog is to showcase CTMH products, an extremely important supporting goal is to simply share my love of scrapbooking. I have therefore decided that I will include projects that use supplies from companies other than Close to My Heart. For sake of clarity and simplicity, I will give credit to the companies when possible, but will label them as "Contraband" when the information is not available. And I will continue to sing the praises of the CTMH products and provide you with ideas/inspiration for using them in your projects.
To begin this new direction in my blog, I want to share an extremely simple layout that uses pattern paper from a paper stack titled Summer Song by My Mind's Eye and some textured cardstock that I pulled from my stash. I inked the edges of the textured cardstock square that holds my focal photograph with Pear Exclusive Ink Pad. I also used the Bohemian Alphabet Stamp Set, E1019, and Pear ink to stamp my title. The paper flowers, buttons, fibers and brads were all pulled from my stash and are all contraband. I inked the edges of the paper flowers with Cotton Candy Exclusive ink and the journalling block was cut using the Tag on page 50 of the CTMH Art Philosophy Cricut cartridge handbook. I covered the holes in the pink portion of the tag with the flower brads to give it some color and texture. This layout came together rather quickly using basic embellishments to add a bit of interest.

To begin this new direction in my blog, I want to share an extremely simple layout that uses pattern paper from a paper stack titled Summer Song by My Mind's Eye and some textured cardstock that I pulled from my stash. I inked the edges of the textured cardstock square that holds my focal photograph with Pear Exclusive Ink Pad. I also used the Bohemian Alphabet Stamp Set, E1019, and Pear ink to stamp my title. The paper flowers, buttons, fibers and brads were all pulled from my stash and are all contraband. I inked the edges of the paper flowers with Cotton Candy Exclusive ink and the journalling block was cut using the Tag on page 50 of the CTMH Art Philosophy Cricut cartridge handbook. I covered the holes in the pink portion of the tag with the flower brads to give it some color and texture. This layout came together rather quickly using basic embellishments to add a bit of interest.

Wednesday, September 4, 2013
September SOTM - Poster Tidings
During the month of September, you can purchase Poster Tidings, the September SOTM, for only $5 with any $50 purchase. This stamp offers two word collages that will work well on either cards or scrapbook pages. Using a masking technique, the sentiments can be used alone to give added versatility to this wonderful stamp set (see my two projects at the end of this post.)
 |
| Two stamped images are included in Poster Tidings, the September SOTM |
 |
| Sample of Artwork that can be created with Poster Tidings |
I have included the CTMH corporate video in which Karlie gives you several additional creative ideas for getting the most out of this stamp set. In the final segment of the video, she demonstrates how she deconstructed the image and then used segments of it along with other embellishments, like washi tape and patterned paper, to produce a totally unique look for a card.
I also want to show you a couple of projects that I made using this stamp set. The first one is a card and I used the entire fall-themed stamp, but I masked off the word blessed for the front of my card. Then when I stamped the sentiment inside, I masked off all but the work blessed. Simple, but it gave me a bit of variety. I stamped using chocolate ink on a scrap of B&T duo paper from the Chantilly Paper Pack.
Monday, September 2, 2013
September is National Stamping Month

Yes, that is right..September is National Stamping Month and Close to My Heart is all about celebrating by offering 3 times the fun with our new stamp set trio of D-size stamps for only $10 with a qualifying purchase. You can get the exclusive You Are My Happy stamp set trio in
celebration of National Stamping Month! During the month of September,
when you make a purchase of $50 or more, you qualify for this whimsical
stamp set trio for only $10. The trio of stamps includes a whimsical alphabet,
light-hearted sentiments, and fanciful images for a variety of occasions
to give a cheerful touch to your projects, with a full retail value of
$47.90.
*Offer valid September 1-30, 2013. Placing a minimum order of $50 is required for qualification.
Dates: Offer valid September 1-30, 2013.
 |
| You Are My Happy National Stamping Month Stamp Set Trio |
Here is a CTMH corporate video that will give you some additional information about this promotion and the stamp set:
Thursday, August 29, 2013
Chantilly, Oh So Simple, Card
I was inspired to make a card using only paper and stamps and this was the result...
I cut a word blurb from Daisy White cardstock at 1 3/4 inches (see page 65) using the Artiste Cricut cartridge. I then stamped the sentiment using Pear Ink. The four strips were also cut using the Art Philosophy cartridge at approximately 4 inches, but these strips could easily be cut with your paper trimmer and the ends could be trimmed into pennant ends with your scissors. Before adhering them to my card base, I used Pear ink to ink the edges of the base.
I cut a strip of Pear cardstock to approximately 1/4 inch and adhered it to my card approximate 1/2 inch from the top of the card. if you prefer, you could also use a coordinating piece of ribbon. I then attached the word blurb using 3-D foam tape instead of the usual piece of ribbon, because I wanted to keep it extremely simple.
 |
| Simple Chantilly Card |
I cut a word blurb from Daisy White cardstock at 1 3/4 inches (see page 65) using the Artiste Cricut cartridge. I then stamped the sentiment using Pear Ink. The four strips were also cut using the Art Philosophy cartridge at approximately 4 inches, but these strips could easily be cut with your paper trimmer and the ends could be trimmed into pennant ends with your scissors. Before adhering them to my card base, I used Pear ink to ink the edges of the base.
I cut a strip of Pear cardstock to approximately 1/4 inch and adhered it to my card approximate 1/2 inch from the top of the card. if you prefer, you could also use a coordinating piece of ribbon. I then attached the word blurb using 3-D foam tape instead of the usual piece of ribbon, because I wanted to keep it extremely simple.
Saturday, August 24, 2013
Chantilly Mini Book
As promised, this post will reveal the inside of my mini-book...


 The pages were cut using the Artiste Cricut Cartridge. I cut the cover page from page 58 of the Artiste handbook using Chatilly B&T pattern Paper and the other two pages were cut from page 59 of the handbook using buttercup cardstock and white daisy cardstock.
I still need to add my journalling, but this mini-book was put together quickly and with minimal embellishments. In a way, the unique shapes of each page work well as a design enhancement, minimizing the need for additional embellishments.


I still need to add my journalling, but this mini-book was put together quickly and with minimal embellishments. In a way, the unique shapes of each page work well as a design enhancement, minimizing the need for additional embellishments.
Saturday, August 17, 2013
Chantilly Prom Layout
There is so much I love about the Chantilly paper pack...and when I sat down to do a layout for my daughter's Junior Prom, the was the paper that called my name :-) I am so happy that Chantilly is still available in the new Autumn/Winter Idea Book, along with the Chantilly Assortment and Dimensional Elements.
First things first, the left hand page...
This page includes the equivalent of two 5x7 pictures, but the one of the left is actually a mini-book. I'll post details about this mini-book in a later post. The flowers across the bottom of my page were inspired by the flowers that graced the cover of our Spring/Summer 2013 Idea Book. I used Buttercup, Cotton Candy and Pear Ink to stamp the flowers and swirls from several stamp sets: D1498 (from the Art Philosophy stamp set); D1482 Love Life; and C1503 The Best Things. The title was stamped in Pear Ink using E1019 Bohemian Alphabet Stamp Set, which is retiring and once the stock is depleted, will no longer be available. As a finishing touch, I added a multitude of pearl embellishments that I have had in my stash for many years.
The right hand page was a very simple layout that featured the Pear cardstock and Pear Ink and a couple of stamped images from The Best Things stamp set. Again, a few pearls scattered on this page, finished the layout.
Look for my companion post (it will be posted in a day or two) that will give you additional details on the mini-book :-)
Also a reminder, the August Stamp of the Month, A Chocolate Affair, is available for FREE with a $50 purchase. This stamp will make a fun, light-hearted addition to your stamp collection.


First things first, the left hand page...
 |
| Junior Prom, Left Hand Page |
 |
| Junior Prom, Right Hand Page |
Look for my companion post (it will be posted in a day or two) that will give you additional details on the mini-book :-)
Also a reminder, the August Stamp of the Month, A Chocolate Affair, is available for FREE with a $50 purchase. This stamp will make a fun, light-hearted addition to your stamp collection.


Tuesday, August 13, 2013
Ribbons and Trims
This is a quick video that explores many of the ribbons and trims offered by Close to my Heart. It not only provides inspiration for how to use many of the different products, it also demos coloring the Slate Satin Polka-Dot Ribbon (and this same technique can also be used to color the Color Ready Seam Binding Ribbon.) This is a fantastic technique, because suddenly your Slate ribbon can now become Sunset and used on a Babycakes card and your Colonial White Seam Binding Ribbon can become Gypsy and added to a treat box that you cut using Laughing Lola and the Artiste Cricut Cartridge. So many options!
Tiffany also alludes to a technique in which you combine re-inker and alcohol to dye the Colonial White Rosette Ribbon. Used as is, the Colonial White Rosette Ribbon is so beautiful and I have used it on several projects that were intended for a baby. However, now that I know that it can be dyed using our re-inkers, my creative juices are flowing.
I also wanted to mention that I have had wonderful results using re-inker and alcohol to dye the color ready seam binding. It is a great technique when you want to dye more than a small piece of ribbon and by adjusting the ratio of re-inker and alcohol, your results can range from muted, soft hues all the way to intense, rich colors. You can experiment to get the look you want. Also, the alcohol helps to speed up the drying process, which is a plus. Being able to apply ink to these ribbons completely opens up the creative possibilities.
Tuesday, August 6, 2013
August SOTM
A Chocolate Affair is CTMH's August SOTM. It will be a wonderful addition to every chocolate lover's stamp collection and with this month's special from CTMH, can be your FREE with any $50 purchase during the month of August.
 |
| Images of the stamps available on A Chocolate Affair |
 |
| Sample of some Artwork that can be made using the August SOTM |
Saturday, August 3, 2013
Buzz and Bumble, The Fun Continues
The lovely Buzz and Bumble paper has certainly been one of my favorite from the Spring/Summer 2013 Idea Book. I will most likely end up using every scrap of paper from that paper pack - because I just love it so much!
Here are two more layouts that I created using papers from this pack.
On my IB Diploma layout, I used cuts from the Artiste Cricut Cartridge and stamps from the Avonlea WOTG. I made the cuts using Sunset cardstock and them stamped the images using Cocoa ink. My title was made using the Canvas Alphabet on which I stamped using Sunset ink and the 2 1/4 inch flower from Hooray Bouquet (D1491) as a background and texture stamp. I love the look of this technique.
Here are two more layouts that I created using papers from this pack.
 |
| Buzz and Bumble, IB Diploma |
 |
| Buzz and Bumble, Remember |
My Remember layout was made exclusively from B&T papers and cardstock, with the exception of the title. The title was from the Avonlea Complements Canvas Shapes and was stamped using Sunset ink and Universal Backgrounds (D1477). A few sparkles from the Brown and Tan Assortment (Z1753) finished this layout.
Wednesday, July 31, 2013
Stamp Scrubber
Here is a quick video from Corporate that demos the CTMH Stamp Scrubber - I have found it to be a wonderful tool for keeping my stamps in the best possible condition.
Saturday, July 27, 2013
Second Buzz and Bumble WOTG Layout
I created this layout for my youngest daughter's school's annual spring fling. I know the original layout featured 3 pictures, but I am a picture lover and I always have a difficult time narrowing down my choice of what pictures to include in each layout. For me to get the selection down to under 10 is usually quite remarkable, but to limit it to only 3 - then I most likely only have 3 pictures of that event :-)
The most obvious modification for my layout was that I opted to use two 4x6 photos instead of the one 8x10 that was featured in the WOTG. I decided with this change in photo size, it would be best if I expanded the vertical height of my sunset colored B&T pattern paper. Also, the sheer length of my title prevented me from trimming a pennant edge on the end of my title block.
My right hand page needed to accommodate four photos (two portrait 2x3's
and 2 square 3x3'3) and again I needed to expand the vertical height of
my sunset colored B&T pattern paper. I still need to add my
journalling, but for all practical purposes, this layout is complete.
I will be posting additional projects that were completed using the paper included in this WOTG - it is amazing how much that can be completed with the supplies that are included in each WOTG. More about that in the near future...
The most obvious modification for my layout was that I opted to use two 4x6 photos instead of the one 8x10 that was featured in the WOTG. I decided with this change in photo size, it would be best if I expanded the vertical height of my sunset colored B&T pattern paper. Also, the sheer length of my title prevented me from trimming a pennant edge on the end of my title block.
 | ||
| Left Hand Page of Spring Fling 2 page layout |
 |
| Right Hand Page of Spring Fling 2 page layout |
I will be posting additional projects that were completed using the paper included in this WOTG - it is amazing how much that can be completed with the supplies that are included in each WOTG. More about that in the near future...
Wednesday, July 24, 2013
Buzz and Bumble WOTG
I recently hosted a Buzz and Bumble Workshop on the Go. This WOTG is one of my favorites...the pattern paper is so beautiful and the detail on the stamp set is simply amazing. The finished layouts are very impressive - and I must say, the pictures simply do not do these layouts justice. I am sad to say that this WOTG will retire at the end of this month, so if you are interested in adding it to your collection, please do so before midnight on 31 August 2013.
When I completed my layouts, I tweaked them just a bit to accommodate my pictures, but I maintained most of the original design and I was so pleased with the results I am sharing the primary layout today and will post the second layout in the near future.
On the Left Page, I strayed from the original design by altering the size of my focal photo, and chose to use some of the space allocated for a 5x7 photo for my journalling. I also utilized the space behind the 9"x6" Cocoa colored B&T patterned paper to create a hidden pocket in which I tucked away a copy of the program for my daughter's Junior Piano Recital (the two protruding pieces of hemp are the pulls to retrieve the program.)
On the right hand page, I needed to accommodate 6 landscape photos. This modification was very easy and the only adjustment to the original design was that I moved the placement of the stamped sentiment "Wonderful, Beautiful Day" and I decided to use the entire sentiment, not just a portion of it, as was done in the original layout.
It is useful to note that this WOTG utilized two wonderful techniques...Masking (note the use of Sunset ink for the word "Beautiful" and the use of Cocoa ink for the remainder of the stamped sentiment) and the use of Blending Pens (notice the color of the word "Seeds" on the stamped image of the seed packet.) Blending Pens were used to sprinkle additional pops of color throughout the layout, and this technique offers a quick and inexpensive way to add color exactly where you want it. Both of these techniques are very easy and fun and the results look quite impressive.
Be sure to look for the second layout created using this WOTG in the coming days :-)
When I completed my layouts, I tweaked them just a bit to accommodate my pictures, but I maintained most of the original design and I was so pleased with the results I am sharing the primary layout today and will post the second layout in the near future.
On the Left Page, I strayed from the original design by altering the size of my focal photo, and chose to use some of the space allocated for a 5x7 photo for my journalling. I also utilized the space behind the 9"x6" Cocoa colored B&T patterned paper to create a hidden pocket in which I tucked away a copy of the program for my daughter's Junior Piano Recital (the two protruding pieces of hemp are the pulls to retrieve the program.)
 |
| Left Hand Page of Recital 2 page layout |
 |
| Right Hand page of Recital 2 page layout |
It is useful to note that this WOTG utilized two wonderful techniques...Masking (note the use of Sunset ink for the word "Beautiful" and the use of Cocoa ink for the remainder of the stamped sentiment) and the use of Blending Pens (notice the color of the word "Seeds" on the stamped image of the seed packet.) Blending Pens were used to sprinkle additional pops of color throughout the layout, and this technique offers a quick and inexpensive way to add color exactly where you want it. Both of these techniques are very easy and fun and the results look quite impressive.
Be sure to look for the second layout created using this WOTG in the coming days :-)
Sunday, July 21, 2013
Background Stamps
Here is a fun video from corporate that demonstrates a couple of the wonderful background stamp sets that CTMH currently has available. Monica demonstrates how the stamps are designed to link and nest, which makes it easy to use them to create your own unique patterned paper. Hope you enjoy!
Wednesday, July 17, 2013
Artiste Swing Card
Here is a card that I made using the CTMH Artiste Cartridge. It is one of several Swing Card that can be cut with this cartridge. They can be found on page 52 of the Artiste handbook. All of these swing cards have companion cuts, some are on the Artiste Cartridge and some are on the Art Philosophy Cartridge. The companion cuts fit into the cut out section of each card.

I cut this card using the Accent 1 Key. And the companion cut, which is found on page 62 of the Art Philosophy handbook, was cut 3 times...twice for the front of the card (the actual front of the card and the backside of the front) and a third time for the inside - which also serves as a place to write a personal message.


I cut this card using the Accent 1 Key. And the companion cut, which is found on page 62 of the Art Philosophy handbook, was cut 3 times...twice for the front of the card (the actual front of the card and the backside of the front) and a third time for the inside - which also serves as a place to write a personal message.

Sunday, July 14, 2013
July SOTM
With a $50 order in July, you will have the opportunity to purchase the July SOTM for only$5. With 6 sentiments and 3 images, it is a great deal for only $5.
 |
| Images from the July SOTM (A Sweet Life) Stamp Set |
 |
| Examples of July SOTM artwork |
Wednesday, July 10, 2013
List of Retiring Products
CTMH is preparing for the launch of the Autumn/Winter 2013 Idea Book and one sure sign of transition to the new idea book is the announcement of the items that will be retiring...I'm providing a list of the products that will retire as of 31 July 2013. So if you see any item that you have been considering purchasing, just know that time is running out....
Also, I do apologize for the fact that this is a rather long list, but I certainly felt that it was important that you at least be made aware of all of the retiring product and can plan accordingly!
Also, I do apologize for the fact that this is a rather long list, but I certainly felt that it was important that you at least be made aware of all of the retiring product and can plan accordingly!
| Part | Description | Category | Family | |
| Z1347 | 12 x 12 Post Bound Album- New England Ivy | Album | album | |
| Z1366 | Brads Metal Assortment | Accessory | brads | |
| Z1410 | Antiqued Copper Designer Brads | Accessory | brads | |
| Z1358 | Buttons Basic Assortment | Accessory | Buttons | |
| Z1369 | Buttons Red Assortment | Accessory | Buttons | |
| Z1370 | Buttons Pink Assortment | Accessory | Buttons | |
| Z1371 | Buttons Blue Assortment | Accessory | Buttons | |
| Z1372 | Buttons Green Assortment | Accessory | Buttons | |
| Z1703 | Wooden Badge Buttons | Accessory | Buttons | |
| Z1704 | Pewter Badge Buttons | Accessory | Buttons | |
| Z1821 | Buttons Black Assortment | Accessory | Buttons | |
| G1060 | Workshops on the Go® For Always Cardmaking Kit | WOTG | Card | |
| G1061 | Workshops on the Go® Chantilly Cardmaking Kit | WOTG | Card | |
| Z1412 | 10-Things Pocket | Paper Product | cards | |
| Z1474 | 6" x 6" Kraft Die-Cut Cards & Envelopes | Paper Product | cards | |
| Z1721 | 3” x 3” Kraft Envelopes | Paper Product | Cards | |
| Z1722 | 4 1/4" x 5 1/2" Kraft Envelopes | Paper Product | Cards | |
| Z1723 | 5” x 7” Kraft Envelopes | Paper Product | Cards | |
| Z1724 | 6” x 6” Kraft Envelopes | Paper Product | Cards | |
| Z1450 | Cork Color-Ready Alphabet | Accessory | Color Ready | |
| Z1718 | Color-Ready Garden Wooden Shapes | Accessory | Color Ready | |
| Z1719 | Color-Ready Evergreen Cork Shapes | Accessory | Color Ready | |
| Z1773 | Color-Ready Noted Canvas Shapes | Accessory | Color Ready | |
| 1771 | WaterbrushMedium | Tool | coloring | |
| Z1246 | EmbPowderCocoa | Tool | coloring | |
| Z1350 | embossing powder topiary | Tool | coloring | |
| Z1351 | embossing powder dutch blue | Tool | coloring | |
| Z655 | EmbPowderOlive | Tool | coloring | |
| Z656 | EmbPowderOutdoorDenim | Tool | coloring | |
| Z659 | EmbPowderCranberry | Tool | coloring | |
| Z670 | EmbPowderBlack | Tool | coloring | |
| Z672 | EmbPowderRed | Tool | coloring | |
| Z673 | EmbPowderWhite | Tool | coloring | |
| Z724 | EmbossingPen | Tool | coloring | |
| X7155C | Avonlea Complements Canvas Shapes | Accessory | Complements | |
| X7156C | Clementine Complements Canvas Shapes | Accessory | Complements | |
| X7157C | Dakota Complements Silver Foil Images | Accessory | Complements | |
| X7159C | Scholastic My Stickease® Assortment | Accessory | Complements | |
| X7164C | Buzz and Bumble My Stickease® Assortment | Accessory | Complements | |
| X7166C | Claire Complements Canvas Shapes | Accessory | Complements | |
| X7167C | Later Sk8r My Stickease® Assortment | Accessory | Complements | |
| Z1392 | 2" Scallop Circle Punch | Tool | cutting | |
| Z578 | Corner Rounder | Tool | cutting | |
| Z1326 | Sparkles Red, Pink & Purple Assortment | Accessory | embellishment | |
| Z1327 | Sparkles Blue & Green Assortment | Accessory | embellishment | |
| Z1710 | Just Blooms® Paradise Paper Flowers | Accessory | Flowers | |
| Z1612 | Paper Clip Pins | Accessory | foundry | |
| Z1827 | My Creations™ Paper Pouch - Small | Crafts | gift | |
| Z1828 | My Creations™ Paper Pouch - Large | Crafts | gift | |
| G1062 | Workshops on the Go® Canvas Art Kit | WOTG | home décor | |
| Z1734 | Irresistibles™ Persnickety Journaling Spots | Accessory | Journaling | |
| Z1755 | Posh Journaling Spots | Accessory | Journaling | |
| G1053 | Workshops on the Go® Chantilly Scrapbooking Kit | WOTG | Layout | |
| G1054 | Workshops on the Go® Buzz and Bumble Scrapbooking Kit | WOTG | Layout | |
| G1055 | Workshops on the Go® For Always Scrapbooking Kit | WOTG | Layout | |
| G1056 | Workshops on the Go® Claire Scrapbooking Kit | WOTG | Layout | |
| G1057 | Workshops on the Go® Later Sk8r Scrapbooking Kit | WOTG | Layout | |
| G1058 | Workshops on the Go® Tommy Scrapbooking Kit | WOTG | Layout | |
| G1059 | Workshops on the Go® Surf's Up Scrapbooking Kit | WOTG | Layout | |
| Z1748 | Brocade Assortment | Accessory | Level 2 | |
| Z1766 | Memo Assortment | Accessory | Level 2 | |
| Z1780 | Wrangler Assortment | Accessory | Level 2 | |
| Z1794 | Cottage Assortment | Accessory | Level 2 | |
| Z1810 | Later Sk8r Assortment | Accessory | Level 2 | |
| Z1813 | Claire Assortment | Accessory | Level 2 | |
| Z1831 | Buzz and Bumble Assortment | Accessory | Level 2 | |
| X7155B | Avonlea Paper Packet | Paper Product | Level 2 | |
| X7156B | Clementine Paper Packet | Paper Product | Level 2 | |
| X7157B | Dakota Paper Packet | Paper Product | Level 2 | |
| X7159B | Scholastic Paper Packet | Paper Product | Level 2 | |
| X7164B | Buzz and Bumble Paper Packet | Paper Product | Level 2 | |
| X7166B | Claire Paper Packet | Paper Product | Level 2 | |
| X7167B | Later Sk8r Paper Packet | Paper Product | Level 2 | |
| Z1487 | Mini Medley Accents Pewter Collection | Accessory | mini medley | |
| Z1489 | Mini Medley Accents Olive Collection | Accessory | mini medley | |
| Z1697 | Mini-Medley Accents Smoothie Collection | Accessory | mini medley | |
| Z1736 | My Creations® Mini Banner | Crafts | My Creations | |
| Z1739 | My Creations® Milk Carton | Crafts | My Creations | |
| Z1740 | My Creations® Bookmark Album | Crafts | My Creations | |
| Z1774 | My Creations® Canvas Journal | Crafts | My Creations | |
| Z1081 | ColonialWhiteWaxyFlax | Accessory | Ribbon | |
| Z1088 | ChocolateWaxyFlax | Accessory | Ribbon | |
| Z1089 | BlackWaxyFlax | Accessory | Ribbon | |
| Z1096 | EmbroideryFlossNeutralAssortment | Accessory | Ribbon | |
| Z1798 | Black Tulle Ribbon | Accessory | Ribbon | |
| Z906 | BambooWaxyFlax | Accessory | Ribbon | |
| W1123 | Spring Summer 2013 B&T Duo Sampler | Supply | Supply | |
| Z1267 | Paper/StampOrganizer8.5x11(3) | organization | ||
| Z4134 | Handle and Swivel Base | organization | ||
| Z4136 | ExclusiveInksOrganizerCarryingCase | Organization | ||
| Z4200 | AccessoriesOrganizer | Organization | ||
| Z608 | EmbossingStylusMedium | Tool | ||
| A1132 | Family | Stamp | A | |
| A1133 | Festival of Lights | Stamp | A | |
| B1372 | Circle Together | Stamp | B | |
| B1395 | So Grateful | Stamp | B | |
| B1396 | School Rocks | Stamp | B | |
| B1405 | Rugged Dude | Stamp | B | |
| B1406 | Blessings of Peace | Stamp | B | |
| B1410 | A Friend Like You | Stamp | B | |
| B1414 | Bonjour | Stamp | B | |
| C1438 | Tea Time | Stamp | C | |
| C1461 | Salutation Seals | Stamp | C | |
| C1466 | Instant Memories | Stamp | C | |
| C1505 | Pun Fun | Stamp | C | |
| C1507 | Angelic Blessings | Stamp | C | |
| C1508 | Paisley Flair | Stamp | C | |
| C1511 | Love Blooms | Stamp | C | |
| C1520 | Christmas Joy | Stamp | C | |
| D1187 | For Every Occasion | Stamp | D | |
| D1388 | Card Chatter - Christmas | Stamp | D | |
| D1399 | Dream Big | Stamp | D | |
| D1440 | Everlasting Life | Stamp | D | |
| D1444 | A Little Thanks | Stamp | D | |
| D1492 | Christmas Love | Stamp | D | |
| D1517 | Game On | Stamp | D | |
| D1519 | Abundance | Stamp | D | |
| D1521 | Powder Heaven | Stamp | D | |
| D1523 | Sweet Music | Stamp | D | |
| D1528 | Jardin | Stamp | D | |
| E1010 | Chocolate Alphabet Large | Stamp | E | |
| E1014 | Posterboard Alphabet | Stamp | E | |
| E1015 | Cocktail Alphabet | Stamp | E | |
| E1017 | Old World Alphabet | Stamp | E | |
| E1018 | Pennant Alphabet | Stamp | E | |
| E1019 | Bohemian Alphabet | Stamp | E | |
| E1020 | Token Alphabet | Stamp | E | |
| E1021 | Trinity Alphabet | Stamp | E | |
| E1022 | Hero Alphabet | Stamp | E | |
| E1023 | Varsity Alphabet | Stamp | E | |
| E1024 | Keepsake Alphabet | Stamp | E | |
| K900 | Single Name Stamp | Stamp | Custom | |
| K9012 | Address Stamp w/o Icon 2 Lines | Stamp | Custom | |
| K9013 | Address Stamp w/o Icon 3 Lines | Stamp | Custom | |
| K9014 | Address Stamp w/o Icon 4 Lines | Stamp | Custom | |
| K9022 | Address Stamp with Icon 2 Lines | Stamp | Custom | |
| K9023 | Address Stamp with Icon 3 Lines | Stamp | Custom | |
| K9024 | Address Stamp with Icon 4 Lines | Stamp | Custom | |
| W1600 | Customized Set | Stamp | Custom |
Subscribe to:
Posts (Atom)