This video shows how pairing the Designed Decor Flip Stand with the CTMH Cricut Artbooking Cricut Cartridge results in a wonderful, and easily personalized, home decor item what will display your photos for everyone to enjoy. You could even create pages with seasonal themes and pictures and change the display throughout the year in order to keep it fresh and timely Imagine beach photos displayed during the summer, Thanksgiving pictures from previous years on display during the month of November and Christmas pictures from previous years on display during the month of December...each year just add a page that features memories from the previous year and your family is sure to enjoy reminiscing about the great times spent together. The Flip Stand is a simple and fun way to bring a few pictures out of your scrapbook albums and right into the center of the fun.

Wednesday, October 30, 2013
Tuesday, October 29, 2013
Project Inspirations: Background Stamps
Lisa explores some "out of the box" uses for background stamps. I am always looking for ways to expand the creative functionality of my supplies and this video provided a couple of fun ideas.
Monday, October 28, 2013
Artbooking Made Easy: Everyday Layouts (S01E08)
The CTMH Artbooking Cricut Cartridge is a dream cartridge for this scrapbooker. It has so many amazing cuts that can be used to embellish any type of layout. Of course, the professionally designed layouts that are are already planned and contained on each of the scrapbooking themed keys are wonderful in and of themselves, but they are only a drop in the creative bucket. In this video, Monica demonstrates the versatility of cuts from several of the themed layouts, showing how beautifully many of these cuts can be used in everyday layouts. My only complaint about this cartridge (or the other two CTMH cricut cartridges) is that I don't ever have enough time to scrapbook! But when I do, I almost always pull creative elements from one of my three wonderful CTMH cricut cartridges to add creativity and variety to my layouts. With 700 images/cuts on each cartridge - I will never run out of options :-)
Sunday, October 27, 2013
Pictures, Pictures, Pictures!
I believe that it is very important to include all aspects of a scrapbook page in each layout...design (over all layout, composition, pattern paper and embellishments), pictures and journalling. But, for me, the pictures are the most important part and often dictate all other aspects of my design. In other words, when planning a layout, I always select my pictures first. Based on the number of pictures I want to include in a layout, I then proceed to pick a layout that will accommodate this number of pictures. I almost always have a lot of pictures on each layout and often this means there is little room left over for embellishment :-(
Today's layout is no exception - it includes 12 pictures! After getting all of my pictures on the layout, there was very limited room for embellishments. This is one reason that I like to treat the journalling area like an embellishment. Today's layout uses two journalling boxes that were cut using the CTMH Artbooking Cricut Cartridge and then stamped using Ruby Exclusive Ink and the coordinating stamp from D1571, Sweet and Love, which is one of the three stamp sets that come bundled with the Artbooking cartridge. I love how the journalling blocks on this layout do double duty - telling the story and embellishing a picture-heavy layout.
The trio of heart's were cut using the heart on page 71 of the CTMH Artise Cricut Cartridge handbook. I welded 3 hearts together for for the base of my embellishment using my Gypsy - but the weld can also be accomplished using the Cricut Craftroom. I then stamped the heart from D1571, Sweet and Lovely, using Ruby ink on a scrap piece of cardstock and then trimmed it out using my micro-tipped scissors. I layered it over the center heart of the trio of hearts using 3-D Foam Tape.
Finally, the title was cut (page 69 of the handbook) using the CTMH Artiste Cricut Cartridge. The pattern paper that served as the base of this layout was from a glitter stack called Laundry Line, by My Mind's Eye.

Thursday, October 24, 2013
Artbooking Made Easy: Fall into Artbooking (S01E07)
Watch the video and see the Autumn/Harvest themed keys in action. Jill will show you what beautiful cuts are included on pages 72 and 73 of the CTMH Artbooking Cricut Cartridge. I love how the photo mats, when cut as a part of the layout, are already sized for my photos, but when I use real-dial size to modify their size, they suddenly become an accent element for my page. In this video, Jill used 3 different sizes and different colored cardstock and the result was the photo mat cut also became the base for two accent clusters and a title. The resulting design continuity was subtle, but effective, because the shape repeated throughout the layout, but the variety of sizes and cardstock colors gave enough diversity to keep the layout interesting, but cohesive.
Saturday, October 19, 2013
Mother's Day Scrapbook Page
Today's layout is from Mother's Day a couple of years ago. I used
contraband cardstock from my stash. The lighter colored textured
cardstock is from Bazzill Basics line called Two Scoops, Irish Mint. and
I have no idea what company the darker cardstock is from. This layout
is a slightly modified layout from CTMH Reflections Scrapbook Program,
page 124, Sampler - Pieced, 10d.
I also stamped using Washi Wonder (an exclusive Hostess Rewards stamp set, D1558) and Olive Exclusive Ink on a scrap piece of Colonial White Cardstock. I then used my micro-tipped scissors to trim the pieces out and then attached them to my layout The Washi Wonder stamps set combined with scraps of cardstock and ink of your choice is like having an endless supply of washi tape to match almost any layout/color/card - so much fun!
My title was cut from CTMH Artiste Cricut Cartridge, page 74 of the handbook. However, I used my micro-tipped scissors to carefully cut away the word "Happy" because I didn't want that in my title.
I also cut the lace medallion using the CTMH Art Philosophy Cricut Cartridge, page 66 in the handbook. I added some bling from my stash (Gemstones from the Paper Studio) to finish off this layout.

Tuesday, October 15, 2013
Project Inspirations: Mixed Papers
I really enjoyed learning a bit about how the CTMH paper packs are designed - with hero papers and what I'd call the side-kick papers (those who play a supporting role in the layouts and let the hero papers take the center stage.) In this video, you will see how easy it is to combine these side-kick papers from various paper packs to get many new design options. Watch and learn....
Sunday, October 13, 2013
Hexagon Card
 |
| Sweet As Honey Card |
My challenge was to use My Acrylix Stamp Set Honeycomb, C1537, Hexagon Irresistibles, Z1858 and the amazing CTMH Artbooking Cricut Cartridge, Z1906.
I cut the border on page 66 of the Artbooking Handbook. Using the Gypsy, is the equivalent of cutting without the real dial size on, so the height of my image ended being a staggering 22 inches...but do not fear, the resulting cut was no where near 22 inches, although it did extend past the 12 x 12 inch Cricut mat. I cut this border using Pear cardstock.
I trimmed off the hexagon that would have been where my sentiment is and then placed the border over my card base (5.5 inches by 4.25 inches) so that the left upper corner of the hexagon at the top of the border aligned with the upper left corner of my card. I glued the border down and then trimmed off any part that extended past my card base.
I then stamped my sentiment using Pear Exclusive Ink (Z2197) Stamp Pad. I used the linen looking hexagon stamp and stamped inside all of my hexagons using the Pear Exclusive Ink.
I used Lagoon Exclusive Ink (Z2195) Stamp Pad, first generation stamping, and the remaining patterned hexagon stamps to stamp in seven of the hexagons, which left two hexagon spots what contained only the pear linen stampings.
I also used the bee and the dashed flight pattern to stamp using Pear Ink. I was able to bend the dashed flight pattern into a curve to get a better fit for the area that I had to work with on my card.
I used Pear Ink and a sponge dauber to color one of the Hexagon Irresistibles and Lagoon Ink and a sponge dauber to the other Hexagon Irresistibles. I then secured them both in the remaining hexagon spots on the card using Glue Dots.
I stamped my sentiment which used two stamp sets... Honeycomb and Card Word Puzzle, C1494.
I hope you enjoy!
Sunday, October 6, 2013
Artbooking Made Easy (S01E05): Halloween Mini Albums
This video sheds some light on the two Halloween Mini Album keys that are on the Close To My Heart Artbooking Cricut Cartridge. These keys are found on pages 54 and 55 of the handbook (keys U and I.) I love how the measurements are already done for us - which certainly cuts done on the prep time needed to complete a mini album. It was also helpful to see the two finished projects and the different looks that can be achieved with cuts from these two keys. Hope you enjoy this video.
Saturday, October 5, 2013
October SOTM
Are you already preparing for Christmas...at my house if the Christmas tree is not up before Thanksgiving- I feel as though I will start the Christmas season behind. My reasoning is that I want to enjoy every single minute of the Christmas season, and if my home is already decorated, then as soon as Thanksgiving is over, we will transition seamlessly into Christmas and all will be well :-) It is also my way of maximizing the days in which I get to enjoy the sights and sounds of the season...
Anyway, early October is a bit early for even me to begin thinking about Christmas, but the amazing staff at CTMH knows that in order to allow time to create our Christmas projects, we should start planning things in October. So my hat goes off to them for reminding me that it is not too early to start thinking about Christmas and making plans for the projects that I want to complete this year.
October's SOTM is just amazing! It contains 5 images, 6 sentiments, and a border stamp. I just love it. And to make it even better, 4 of the images have corresponding cuts on the CTMH Art Philosophy Cricut Cartridge! This will truly be a fun SOTM, and it can be yours for just $5, with any $50 purchase during the month of October.
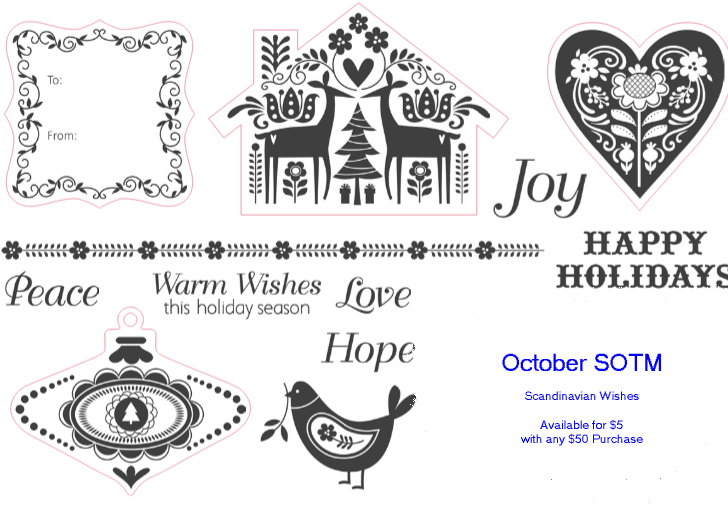 |
| Images that are included in Scandinavian Wishes |
 |
| Samples of Artwork using Scandinavian Wishes |
Wednesday, October 2, 2013
Loving 4x8 Cards
I have quite a few envelopes leftover from the 4x8 photo Christmas Photo Cards that I am fond of sending. Over the years, I have saved the extras, so I have quite a collection. I recently needed to make a couple of cards and decided this would be a fun size to make. Here are the directions for each card:
I started by cutting an 8x8 inch square from White Daisy cardstock for each card. I then folded each square in half to get my 4x8 inch card bases.
I then cut two 4x8 rectangles from For Always B&T pattern paper.
I cut two 10 inch lengths from the Tulle Ribbon, which is a retired product, I regret to say. But I do love it and will be quite sad when I use up my roll.
For each of my two cards, I then cut the Tag at 2 inches from page 41 of the Art Philosophy Cricut Cartridge using the For Always B&T pattern paper and two additional cuts from the scrap of my White Daisy cardstock. I glued this three layers together to get result in a chipboard like piece. I also cut three circles at 1.25 inches from page 48 of the Artiste Cricut Cartridge from the White Daisy cardstock scraps and glued them together to get a chipboard like piece.
I stamped different sentiments on the circles... I stamped the sentiment frame from the Perfect Fit Thanksgiving My Acrilix Stamp Set, B1427, using Black Exclusive Ink. I then stamped the Thank You sentiment from the same stamp set on on and the words, "Thinking of You" from Card Word Puzzle, C1494, on the other. I then adhered the circles onto my tags, centering.
Next, I threaded the tulle segments through the openings on my tags and the centered them on my 4x8 rectangle of the For Always B&T pattern paper. I used tape to secure the tulle to the back of the B&T paper. I then adhered this to me card base. The last step was to attached a 3/8 inch by 8 inch strip of For Always B&T pattern paper. I will eventually stamp a sentiment on the inside of the cards, but I'll save that step until I actually use the cards and that way I can tailor the sentiment to the recipient.
I also wanted to make the envelopes coordinate with the cards so I attached a 6x2.5 inch scrap of to the inside of my envelopes. This segment of coordinating B&T paper covered a section of gold foil that lined some of my envelopes, which was a vast improvement because there was no gold anywhere on either of these two cards! Here are pictures of my cards and the coordinating envelope:
 |
| Thinking of You Card |
 |
| Thank You Card |
 |
| The inside of the two cards |
 |
| The Inside of the Coordinating Envelope |
Subscribe to:
Posts (Atom)