
Sunday, October 13, 2013

Hexagon Card
 |
| Sweet As Honey Card |
My challenge was to use My Acrylix Stamp Set Honeycomb, C1537, Hexagon Irresistibles, Z1858 and the amazing CTMH Artbooking Cricut Cartridge, Z1906.
I cut the border on page 66 of the Artbooking Handbook. Using the Gypsy, is the equivalent of cutting without the real dial size on, so the height of my image ended being a staggering 22 inches...but do not fear, the resulting cut was no where near 22 inches, although it did extend past the 12 x 12 inch Cricut mat. I cut this border using Pear cardstock.
I trimmed off the hexagon that would have been where my sentiment is and then placed the border over my card base (5.5 inches by 4.25 inches) so that the left upper corner of the hexagon at the top of the border aligned with the upper left corner of my card. I glued the border down and then trimmed off any part that extended past my card base.
I then stamped my sentiment using Pear Exclusive Ink (Z2197) Stamp Pad. I used the linen looking hexagon stamp and stamped inside all of my hexagons using the Pear Exclusive Ink.
I used Lagoon Exclusive Ink (Z2195) Stamp Pad, first generation stamping, and the remaining patterned hexagon stamps to stamp in seven of the hexagons, which left two hexagon spots what contained only the pear linen stampings.
I also used the bee and the dashed flight pattern to stamp using Pear Ink. I was able to bend the dashed flight pattern into a curve to get a better fit for the area that I had to work with on my card.
I used Pear Ink and a sponge dauber to color one of the Hexagon Irresistibles and Lagoon Ink and a sponge dauber to the other Hexagon Irresistibles. I then secured them both in the remaining hexagon spots on the card using Glue Dots.
I stamped my sentiment which used two stamp sets... Honeycomb and Card Word Puzzle, C1494.
I hope you enjoy!
Sunday, October 6, 2013
Artbooking Made Easy (S01E05): Halloween Mini Albums
This video sheds some light on the two Halloween Mini Album keys that are on the Close To My Heart Artbooking Cricut Cartridge. These keys are found on pages 54 and 55 of the handbook (keys U and I.) I love how the measurements are already done for us - which certainly cuts done on the prep time needed to complete a mini album. It was also helpful to see the two finished projects and the different looks that can be achieved with cuts from these two keys. Hope you enjoy this video.
Saturday, October 5, 2013
October SOTM
Are you already preparing for Christmas...at my house if the Christmas tree is not up before Thanksgiving- I feel as though I will start the Christmas season behind. My reasoning is that I want to enjoy every single minute of the Christmas season, and if my home is already decorated, then as soon as Thanksgiving is over, we will transition seamlessly into Christmas and all will be well :-) It is also my way of maximizing the days in which I get to enjoy the sights and sounds of the season...
Anyway, early October is a bit early for even me to begin thinking about Christmas, but the amazing staff at CTMH knows that in order to allow time to create our Christmas projects, we should start planning things in October. So my hat goes off to them for reminding me that it is not too early to start thinking about Christmas and making plans for the projects that I want to complete this year.
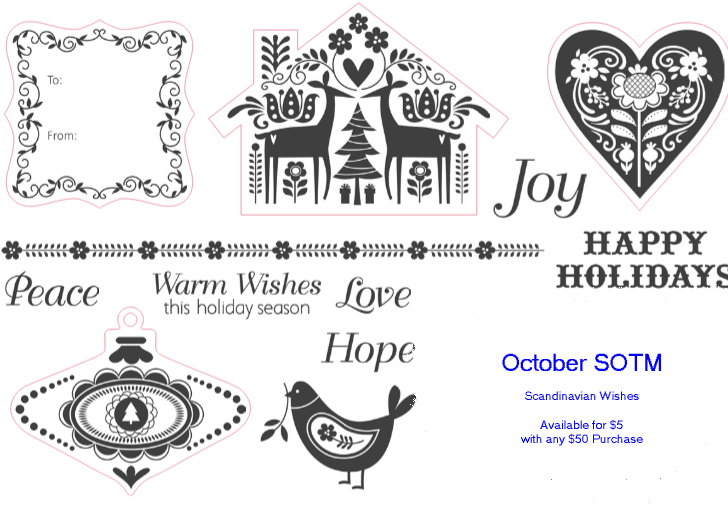
October's SOTM is just amazing! It contains 5 images, 6 sentiments, and a border stamp. I just love it. And to make it even better, 4 of the images have corresponding cuts on the CTMH Art Philosophy Cricut Cartridge! This will truly be a fun SOTM, and it can be yours for just $5, with any $50 purchase during the month of October.
Anyway, early October is a bit early for even me to begin thinking about Christmas, but the amazing staff at CTMH knows that in order to allow time to create our Christmas projects, we should start planning things in October. So my hat goes off to them for reminding me that it is not too early to start thinking about Christmas and making plans for the projects that I want to complete this year.
October's SOTM is just amazing! It contains 5 images, 6 sentiments, and a border stamp. I just love it. And to make it even better, 4 of the images have corresponding cuts on the CTMH Art Philosophy Cricut Cartridge! This will truly be a fun SOTM, and it can be yours for just $5, with any $50 purchase during the month of October.
 |
| Images that are included in Scandinavian Wishes |
 |
| Samples of Artwork using Scandinavian Wishes |
Wednesday, October 2, 2013
Loving 4x8 Cards
I have quite a few envelopes leftover from the 4x8 photo Christmas Photo Cards that I am fond of sending. Over the years, I have saved the extras, so I have quite a collection. I recently needed to make a couple of cards and decided this would be a fun size to make. Here are the directions for each card:
I started by cutting an 8x8 inch square from White Daisy cardstock for each card. I then folded each square in half to get my 4x8 inch card bases.
I then cut two 4x8 rectangles from For Always B&T pattern paper.
I cut two 10 inch lengths from the Tulle Ribbon, which is a retired product, I regret to say. But I do love it and will be quite sad when I use up my roll.
For each of my two cards, I then cut the Tag at 2 inches from page 41 of the Art Philosophy Cricut Cartridge using the For Always B&T pattern paper and two additional cuts from the scrap of my White Daisy cardstock. I glued this three layers together to get result in a chipboard like piece. I also cut three circles at 1.25 inches from page 48 of the Artiste Cricut Cartridge from the White Daisy cardstock scraps and glued them together to get a chipboard like piece.
I stamped different sentiments on the circles... I stamped the sentiment frame from the Perfect Fit Thanksgiving My Acrilix Stamp Set, B1427, using Black Exclusive Ink. I then stamped the Thank You sentiment from the same stamp set on on and the words, "Thinking of You" from Card Word Puzzle, C1494, on the other. I then adhered the circles onto my tags, centering.
Next, I threaded the tulle segments through the openings on my tags and the centered them on my 4x8 rectangle of the For Always B&T pattern paper. I used tape to secure the tulle to the back of the B&T paper. I then adhered this to me card base. The last step was to attached a 3/8 inch by 8 inch strip of For Always B&T pattern paper. I will eventually stamp a sentiment on the inside of the cards, but I'll save that step until I actually use the cards and that way I can tailor the sentiment to the recipient.
I also wanted to make the envelopes coordinate with the cards so I attached a 6x2.5 inch scrap of to the inside of my envelopes. This segment of coordinating B&T paper covered a section of gold foil that lined some of my envelopes, which was a vast improvement because there was no gold anywhere on either of these two cards! Here are pictures of my cards and the coordinating envelope:
I started by cutting an 8x8 inch square from White Daisy cardstock for each card. I then folded each square in half to get my 4x8 inch card bases.
I then cut two 4x8 rectangles from For Always B&T pattern paper.
I cut two 10 inch lengths from the Tulle Ribbon, which is a retired product, I regret to say. But I do love it and will be quite sad when I use up my roll.
For each of my two cards, I then cut the Tag at 2 inches from page 41 of the Art Philosophy Cricut Cartridge using the For Always B&T pattern paper and two additional cuts from the scrap of my White Daisy cardstock. I glued this three layers together to get result in a chipboard like piece. I also cut three circles at 1.25 inches from page 48 of the Artiste Cricut Cartridge from the White Daisy cardstock scraps and glued them together to get a chipboard like piece.
I stamped different sentiments on the circles... I stamped the sentiment frame from the Perfect Fit Thanksgiving My Acrilix Stamp Set, B1427, using Black Exclusive Ink. I then stamped the Thank You sentiment from the same stamp set on on and the words, "Thinking of You" from Card Word Puzzle, C1494, on the other. I then adhered the circles onto my tags, centering.
Next, I threaded the tulle segments through the openings on my tags and the centered them on my 4x8 rectangle of the For Always B&T pattern paper. I used tape to secure the tulle to the back of the B&T paper. I then adhered this to me card base. The last step was to attached a 3/8 inch by 8 inch strip of For Always B&T pattern paper. I will eventually stamp a sentiment on the inside of the cards, but I'll save that step until I actually use the cards and that way I can tailor the sentiment to the recipient.
I also wanted to make the envelopes coordinate with the cards so I attached a 6x2.5 inch scrap of to the inside of my envelopes. This segment of coordinating B&T paper covered a section of gold foil that lined some of my envelopes, which was a vast improvement because there was no gold anywhere on either of these two cards! Here are pictures of my cards and the coordinating envelope:
 |
| Thinking of You Card |
 |
| Thank You Card |
 |
| The inside of the two cards |
 |
| The Inside of the Coordinating Envelope |
Thursday, September 26, 2013
Artbooking Made Easy (S01E04): Spooky Halloween Layouts
The newest Artbooking video and it features Halloween layouts - so fun!
Tuesday, September 24, 2013
Spin Cards - My Take
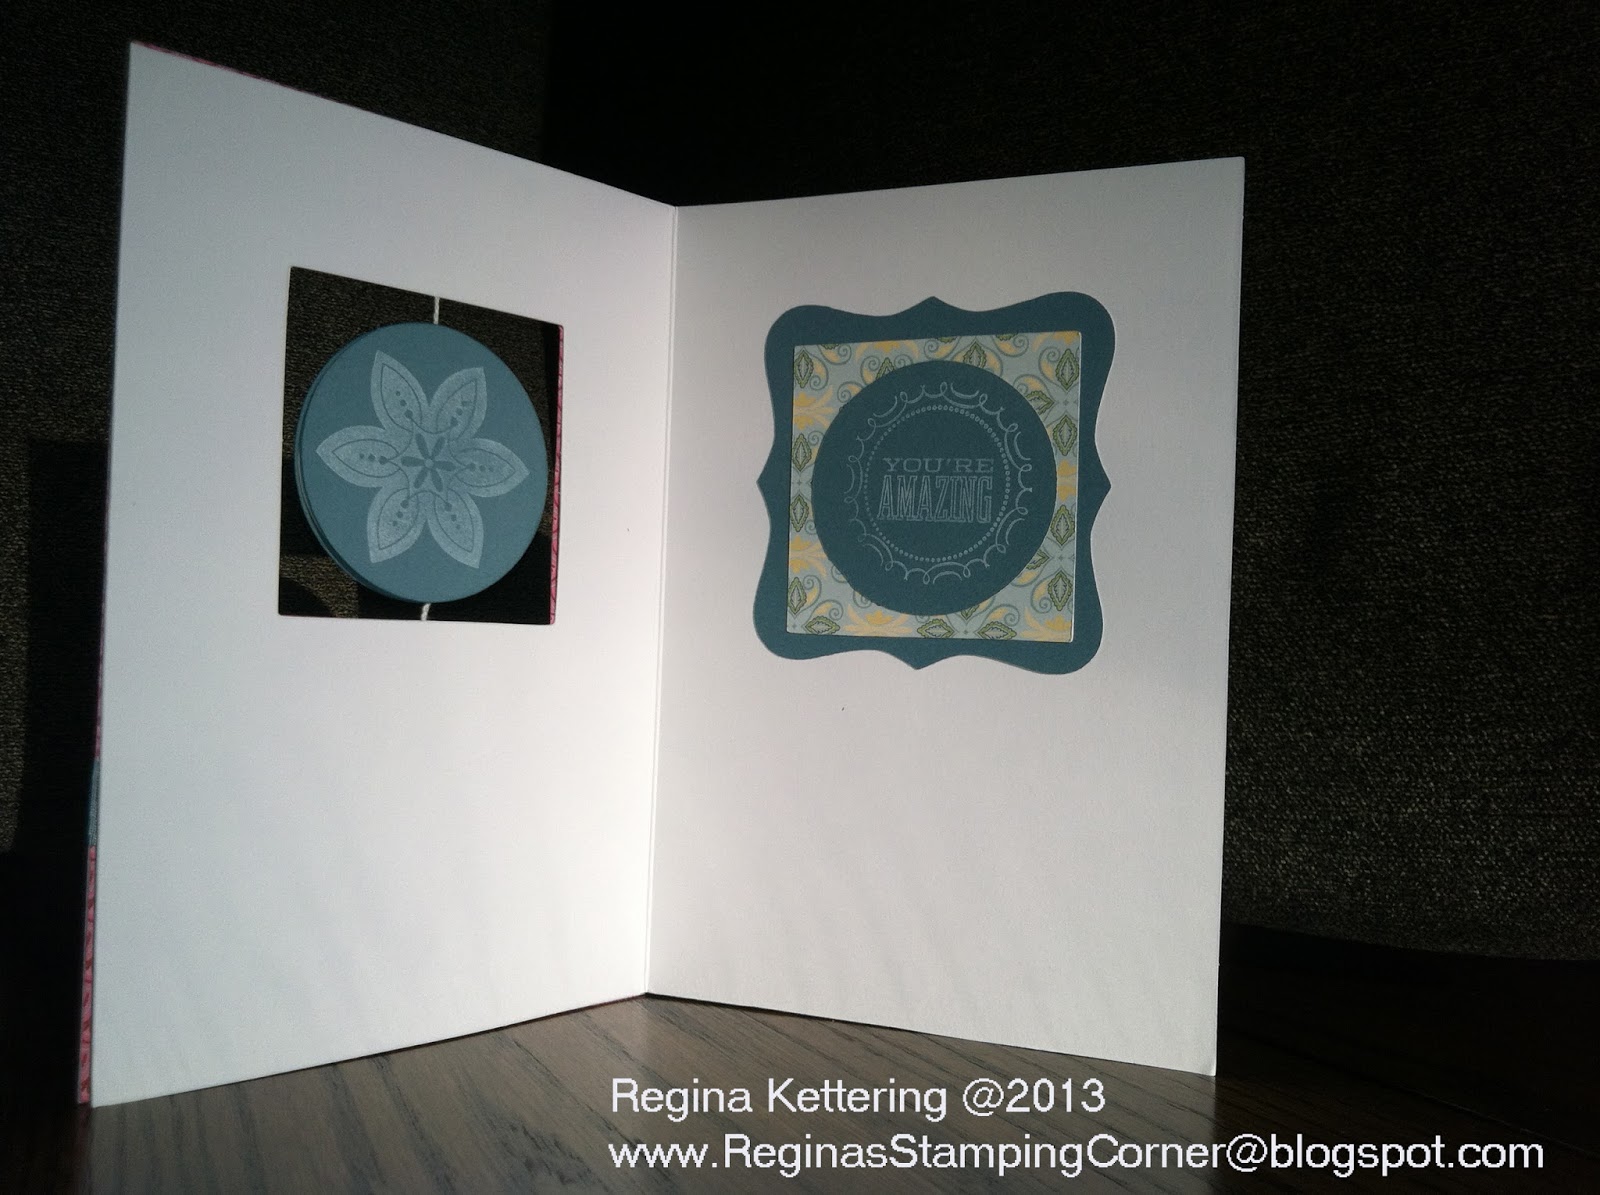
The new CTMH Spin Cards are a lot of fun to make and they offer the crafter a fresh, new, fun pallet upon which to be creative. I recently hosted a card workshop and these are the cards that I came up with for my ladies to make...
To make this set of cards, I used the Chantilly paper pack because it still remains one of my absolute favorite paper packs! After making a set of 10 cards, there was still plenty of paper left over to use for other projects, so I'm sure you will see Chantilly used in future posts!
I used the following supplies:
White Daisy Spin Cards and Envelopes, z1866
Chantilly Paper Pack, x7162b
CTMH Art Philosophy Cricut Cartridge, x1686
Color Ready Seam Binding, z1732
Sparkles Clear Assortment, z1752,
Cotton Candy Re-Inker, z2293
Buttercup Re-Inker, z2210
Twilight Re-Inker, z2260
The solid color card stock pieces were all cut from cardstock included in this paper pack: Cotton Candy (Card 1), Buttercup (Card 2), and Twilight (Card 3). For each card I cut:
Card 1 was stamped using Cotton Candy Exclusive Ink and
I also dyed a 10 inch segment of Color Ready Seam Binding, z1732, for each card using the corresponding color of Re-Inker. I also used three 4 mm Clear Sparkles on each car. At this point in the process it is only a matter of assembling each card.
Just one more tip: you could also choose to just save the circles and stamp them with whatever theme you may need for a card in the future! This is a great way to maintain maximum versatility - the card can become whatever theme you need it to become - birthday, thank you, get well, etc.
 |
| Front of Card 1 |
 |
| Inside of Card 1 |
 |
| Inside of Card 2 |
 |
| Front of Card 2 |
 |
| Front of Card 3 |
 |
| Inside of Card 3 |
To make this set of cards, I used the Chantilly paper pack because it still remains one of my absolute favorite paper packs! After making a set of 10 cards, there was still plenty of paper left over to use for other projects, so I'm sure you will see Chantilly used in future posts!
I used the following supplies:
White Daisy Spin Cards and Envelopes, z1866
Chantilly Paper Pack, x7162b
CTMH Art Philosophy Cricut Cartridge, x1686
Color Ready Seam Binding, z1732
Sparkles Clear Assortment, z1752,
Cotton Candy Re-Inker, z2293
Buttercup Re-Inker, z2210
Twilight Re-Inker, z2260
The solid color card stock pieces were all cut from cardstock included in this paper pack: Cotton Candy (Card 1), Buttercup (Card 2), and Twilight (Card 3). For each card I cut:
- three circles (pg 21 of the Art Philosophy handbook)
- one shaped base (page 53 of the Art Philosophy handbook) (used on the inside of the card)
- one 5x2 inch rectangle.
Card 1 was stamped using Cotton Candy Exclusive Ink and
- Heartfelt Birthday Wish, M1033
- You Only Live Once, B1434 (Only available as a Hostess Reward)
- Hooray Bouquet, D1491
- Baby Carriage, M1027
- Babycakes WOTG Stamp Set, D1569
- A Garden, A1119
- A True Thank You, M1029
- You Only Live Once, B1434 (Only available as a Hostess Reward)
- Love/Joy/Hope/Fun, D1498 (One of 2 Stamp Sets bundled with Art Philosophy)
I also dyed a 10 inch segment of Color Ready Seam Binding, z1732, for each card using the corresponding color of Re-Inker. I also used three 4 mm Clear Sparkles on each car. At this point in the process it is only a matter of assembling each card.
Just one more tip: you could also choose to just save the circles and stamp them with whatever theme you may need for a card in the future! This is a great way to maintain maximum versatility - the card can become whatever theme you need it to become - birthday, thank you, get well, etc.
Subscribe to:
Posts (Atom)